Monday, January 25, 2016

Operations 2: A Brief look at Yards and Car Movement Cards

As I mentioned previously, I wasn't really thinking about model railroad operations when I first designed my layout.  I mostly wanted a a long mainline run so I could watch a couple of trains roll by.   Fortunately when I became interested in operations, the layout offered enough possibilities to make ops feasible and I've made some adaptations to increase the fun.

One of the biggest obstacles to my running trains in a prototypical fashion is the fact that I didn't include a good sized yard in my track plan.    The layout fills a 12.5 X 20 foot room in my basement.  I walk into the narrow space between the two return loops shown in the crude sketch below.  The dotted rectangle coming down the middle of the room was an idea for an add-on yard I flirted with, but in the end I decided I prefer the nice open space in the middle of the room and easy access to both sides of the layout


I know I'm missing a part of the fun of model railroad operations by not having a main yard to build and break down trains, but I've managed to find some creative ways to stage trains that come on and off the layout.  I imagine there is a large yard near Kings Port called Williams Yard (named after my Uncle Bill, who years ago gave me boxes of his old HO equipment when he switched to N scale).   WilliamsYard is represented by hidden track that goes under the overpass this picture.  Trains are made up by hand and reversed under the overpass to be staged for future use.

I do have a small Car Float Yard on the other side of the layout at West Mill so I can enjoy some of the fun of making up trains there.   Transfer runs to the Car Float Yard are broken up into small trains serving local industries, or as transfers to Mayfield Yard on the KP&W track branching off at Empire Grain. 

Mayfield Yard is represented by two hidden tracks here.

The Float Yard and Mayfield Yard are two destinations some of my trains can go.  I can also use hidden portions of the main line to stage trains.    After some tinkering around, I've come up with an ops scheme that allows me to move up to seven trains during an extended session. 

For now, however, let's take a look at how I'm hoping to use the Car Movement Cards.  For illustrative purposes I'll use a one car train on Extra #3007 (referred to by locals as "The Growler" because of the Bachmann GP40's noise...which is actually much quieter after I put some electrical tape inside the shell to reduce shell vibration.  I think the unit itself is getting quieter over time as well.)  

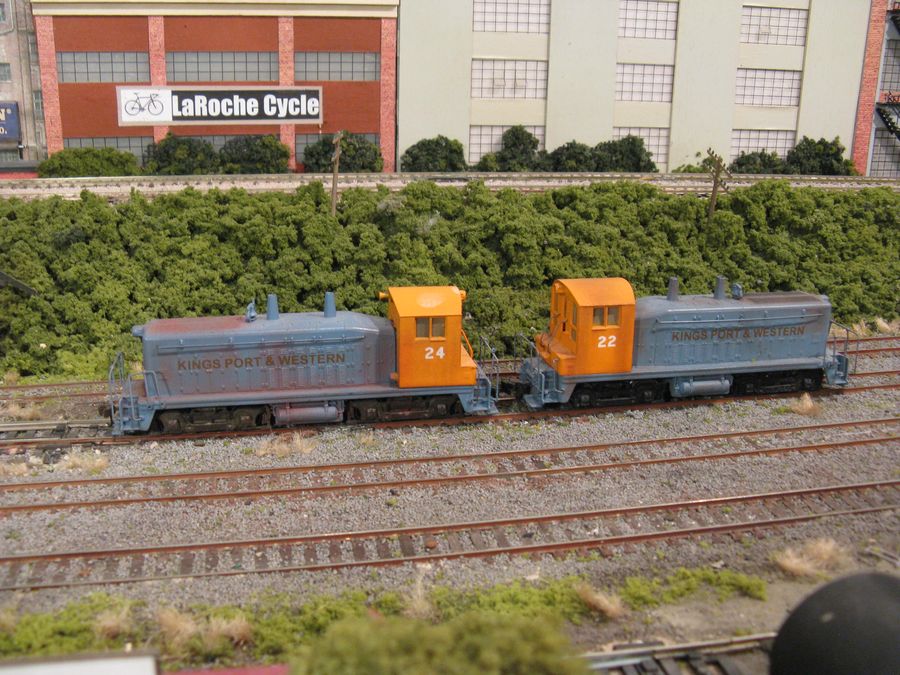
Any way....Extra #3007 emerges from the overpass, presumably having just left Williams Yard...
...with its one Penn Central boxcar and caboose in tow.


The car card for the boxcar came from this box mounted on the layout fascia that now represents Williams Yard.

I'm in the process of writing one or more cards for every car on the layout.   As a way of generating traffic on the layout, I could shuffle the cards and pull out as many as I wish to work with, but I'm also considering taking a look at JRMI, or going back to Dallas Model Works hobby site to take another look at the free traffic generator feature they offer.   

In today's example I pulled one card for the PC 50 foot boxcar #229046. 
As noted above, it is destined for Mayfield Yard where it will be delivered to the off-layout consignee, Peerless Appliance.   Its loaded with gaskets from the Leike Gasket Company.   The car will be "off -going" (as in leaving the PC system) at West Mill where it will be picked up and handled the rest of the way by my freelanced Kings Port & Western Railroad.   

Flipping the card over reveals information about its return trip after unloading at Peerless Appliance, so its a two cycle card.  Despite all of the information on this side about the car going to Rotterdam Junction and onward to Massachusetts on the B&M, I really only need to route it to staging at Williams Yard.  The rest of the information just makes it more interesting for me.
For now though, I'm taking the card with me as I run Extra 3007 as its corresponding car is part of the train.

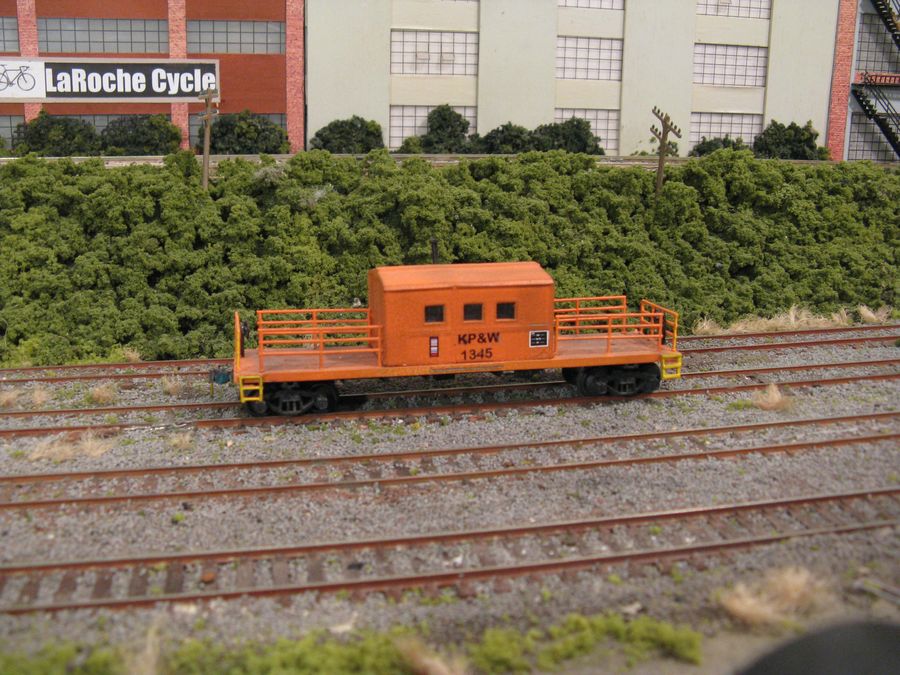
I thought I'd throw in another move to illustrate the use of the new card boxes I described in my previous post.   Michigan Central Gondola #350623, loaded with steel pipe from nearby KP Steel,  is waiting on an interchange track for Extra #3007 to pick it up.

Here is the interchange track's box with the car movement card for  MC #350623 in it and ready to go.  

 The car card for the gondola shows its reporting information and notes that its being routed to Terminal Yard for delivery to Gervais Pipe and Fitting in Empire City.  This REALLY "off-layout" destination is actually located on a friend's layout in Georgia!  (More on these very fun, long distance "virtual ops" later).  I'll represent the gondola's trip to Terminal Yard on my layout by running the train into hidden staging. 

Once the gondola is picked up I'll pull the card out  from the box and take it with me as I run the train.


Next up:  Extra #3007 arrives at West Mill's Float Yard where it will drop off PC boxcar #229046, so it can be picked up later by the KP&W for Mayfield Yard.

The PC boxcar is set out....

...and its corresponding card is placed in the Float Yard box to indicate its presence at the Float Yard and describe its next move (to Mayfield).  


The rest of the train heads off to staging (presumably to Terminal Yard in Empire City.

Later that day the King Port & Western's "Mayfield Turn" arrives at West Mill to drop off and pick up cars at the Float Yard.

Again for illustrative purposes I'm making this a one car train with only KP&W's 50 foot plug door boxcar #15630 behind the two F7s. 

Here is the corresponding card for that KP&W car.
The card indicates that the car is loaded with new washing machines made by Peerless Appliance that are bound for Battaglia Bros. Warehouse in Kings Port.   For the Penn Central, the card notes that the car is "On-coming" to its system at West Mill from the KP&W.

 The KP&W boxcar is dropped off at the Float Yard...

...And its corresponding card is placed in the Float Yard box

The "Turn" picks up Penn Central boxcar #229046 (and its car card is removed from the Float Yard box)...

...and heads off layout to Mayfield with the PC car that will eventually to be delivered to Peerless Appliance.

Once the train is off-layout, the card for PC car #229046 is placed in the box for Peerless Appliance, indicating that is where the car is.  The card is flipped over to indicate its return movement to Williams Yard (and eventually to Leike Gasket in Montaque, MA.) in the next ops session.

Well, this post is plenty long!  I hope it conveys a sene of what I'm tryng to do with ops nowadays.  You railroaders out there, please feel free to provide feedback regarding the use of the cards.

Thanks for taking a look everyone! 

Wednesday, January 13, 2016

Operations 1 New Car Cards and Boxes

Its time to talk about how I run my layout.  When I first conceived the layout's track plan I was most interested in creating a long main line that would allow me to run two trains simultaneously.   I succeeded with that goal and am pleased that it takes five minutes for a train to run the entire circuit.  Although not really operations-minded at the time, I did have the wherewithal to add a long siding that goes from one side of the layout to the other that provides opportunities to switch a train while the continuously running trains go by.   That decision set the stage for me to develop an operations scheme in later years when the "ops bug" bit me.  

I'll describe my new car card boxes today and expand on how I run the layout in future posts.  Up until recently, I've shied away from car cards and preferred to use switch lists, or else simply did the exchange-a-car-for-a-car approach to ops without noting things like car numbers.   For a while I was using a simple but effective system I learned about from an article on the online Model Railroad Hobbyist Magazine.  Here is a video from that article describing the ops scheme.

 https://www.youtube.com/watch?v=K3c1ppFB4rs

I made some modifications to the idea and posted my own video:

 https://www.youtube.com/watch?v=hq2qKciGRDk

Some recent conversations about operations with model railroad friend John R. led him to email me a link to this Penn Central Car Movement Card found on the Penn Central Online site in the "Library" section.   http://pc.smellycat.com/docs/index.html


I was immediately interested in this card and thought it would be fun to use it in model railroad operations.   After more conversations with John about the possibilities of using such cards, I decided to print a few hundred (with the image on both sides) on 100 lb. manila colored card stock, courtesy of Office Max's printing services.   They have a nice prototypical look and feel.

Since then, I've been filling out cards to reflect rolling stock that might be shipped to the various industries on my layout.  Since the cards are printed on both sides I can create a two-cycle operations scheme for each car.   I'll describe this in more detail in future posts along with a cool "virtual ops" scheme with the car cards that's developing between me and John, even though we live over a thousand miles apart. 

Using cards requires some organization.   I've seen the car card boxes commercially available at MicroMark:

http://www.micromark.com/SearchResult.aspx?deptIdFilter=0&searchPhrase=car+card+boxes

... but wanted to make my own.   I came up with this design:


I wanted to avoid having them stick out too far from the fascia so I made them pretty flat.  Each has enough room to hold 25 cards though, so they'll fit the bill just fine.  The maximum number of cars any of my industries might accommodate is the rare 25 cars at KP Steel.   I made one for each industry (only a few are shown above) including those that are "off layout', (i.e. represented by hidden staging tracks and not actually modeled).   I'll actually be posting more about these off layout industries and a way I'm developing to make them seem more real. 

 More examples of the card boxes:

The box for Hedberg Aggregates with the industry shown on the upper level in the background.

The two cards in the box note the empty open hopper and the tank car sitting on Hedberg's spur.

GERN Industries, Battaglia Bros. Warehouse, Blue Ribbon Flour
  Empire Grain
 Sal Monella's Auto Salvage
 The West Mill Car Float Yard

I'm just getting started but I'm finding the cards enhance operations and fun!

Tuesday, January 5, 2016

ALCO Quest!

Hello all,

I could subtitle this post:  "Relieving Hobby Flea Market Regret".

Last Spring I attended a Model Railroad Flea Market sale at the Minnesota State Fairgrounds and saw a table with a few Atlas Yellow Box locomotives from the early 1980's, still new in the box.    I was intrigued because the previous year I purchased an undecorated Atlas GP38 for around $30.00 that runs very nicely on my layout.  I painted it as a Penn Central unit.

Keeping this satisfaction with Atlas Yellow Box locos in mind, I looked over the selection at the Spring sale and was especially interested in an undecorated RS3.   I've always liked the styling of the RS3, by far ALCO's most successful locomotive.   I have a dummy RS3 made by AHM painted for my Kings Port & Western freelanced road and thought it would be nice to add a powered unit to the RS3 consist. 

So...I looked at the loco and the $40.00 price tag and for some reason walked away, telling myself I really didn't need it.   Of course, as soon as I got home I immediately regretted not buying the loco.  I consoled myself with the thought that the Fairgrounds also hold a Fall show where I might find another RS3 for sale.  Well, time went by and the Fall sale arrived, but after perusing dozens of tables I did'nt encounter any Yellow Box RS3s.  Arrgggh!   Obtaining one of the classic ALCOs started becominga quest!

I turned to eBay and was pleased to see a number of Atlas Yellow Box RS3s for sale!   Up until then I'd had limited experience with eBay, but had easily won both of the two auctions I had participated in.  I figured it would be a piece of cake to win an RS3 for a price similar to the Fairground vendors.  

What happened though, was after following several auctions for days, I was outbid at the last second time after time!   It seemed that all of a sudden everyone wanted Atlas Yellow Box RS3s and the selling prices started reflecting the demand.   Many sold well over the $40.00 Fairgrounds price.     

I gave up for a few weeks and then one evening randomly checked eBay again where I found an undecorated RS3 listed for less than 40.00 with only about an hour left in the auction.  I waited until the last minute and bid a couple dollars more than the last bid...and won!!!

My lucky find right out of the box.   The safety rails at the long hood end broke in the mail but I was able to repair them.  

 The new loco coupled to the AHM dummy that inspired the purchase.   I briefly flirted with making the new RS3 a Penn Central unit but decided the KP&W needed more motive power, especially for interchange and switching duties.  After procuring the Atlas loco,  I have to say I'm less satisfied with the AHM dummy by comparison. 

I found that the original spray paint color I used for my early blue and orange KP&W scheme was no longer available.   It took me a while to find a shade of blue that was a reasonable approximation.   While preparing the RS3 for painting I learned that the old Atlas RS3 shells come apart in three sections.    The base with the walk way and handrails is a separate piece, as is the main body and also the cab.  Being able to pull the cab off the hood section made it easy to paint it orange but I was surprised by the two-part assembly of hood and walkways.   The base the hood sits on is rather flexible and fragile, as are the hand rails.  Care was required in disassembly and reassembly, but it all worked out.  

The new unit with earlier versions.  Not a bad match.


I replaced the horn hook couplers with Kaydees and learned that despite the fact that the screw holding the coupler had a Phillips head, it was actually a pin that required removal by needle nose pliers.    Even though the new KP&W RS3 lacks a number and lettering I've already put it to work.   Here it sets out a company covered hopper at Empire Grain.  

I haven't attempted lettering the unit with the home made decals from white decal paper I applied to my older units.   I'm looking into having some white Kings Port & Western decals custom made.  This will be great for future locos and also for black coal hoppers I'd like to letter for my freelanced line. 

So, I'm letting this be a lesson for myself.  If I see something I really want at a Flea Market sale...I'm gonna buy it!

Sunday, December 13, 2015

Introducing the Kings Port & Western Part 2

Hello all,

Just a follow up to my previous post providing glimpses at KP&W rolling stock and locomotives.   Over time, I've experimented with variations of the KP&W image, tweaking the herald and experimenting with colors.   Examples of KP&W equipment follow below.


These covered hoppers are former Tyco cars I've had since I was a teenager in the mid 1970s.  I cut off the the original horn hook couplers from the trucks, replaced them with body mounted Kaydees,  and replaced the plastic wheels with metal wheel sets.    I like the solid heft of these cars.  These two former billboard cars were originally decorated for Kellogg Cereals and Morton Salt.


I bought these two cylindrical covered hoppers at a flea market for a couple bucks a piece.   Both were painted and decaled for the KP&W and had Kaydee couplers added. The one on the left is a "patch job" with the grey rectangle obscuring the original Santa Fe logo. 

Another patch job of what I believe is an Athearn car purchased at a flea market...

Moving on from covered hoppers, here are examples of the infamous Bachmann steel coil cars that seem to show up at every flea market for a dollar or two.  Despite the fact that the prototype proved to be unreliable and dangerous as the hatch covers would either jam or drop unexpectedly,  I still like their design.  I've purchased seven of these cars, originally decorated either as P&LE or B&LE rolling stock.   In my imaginings, the KP&W shops improved the performance of the hatches and put the cars into regular service...most often seen at KP Steel in Kings Port, shown below.   I've often seen these cars referred to as "Clam Shell" coil cars but have recently learned that in the industry they were known as "Bread Box Trough" cars.
I patch job-lettered all seven coil cars for the KP&W, added body mounted couplers, and discarded the odd "tootsie roll" insert that is apparently supposed to represent steel coils.   I've made my own coils (seen at the lower right in the photo above)  out of grey or silver paper wrapped around a dowel stick,  that I can put in an open car if I wish.  

I experimented with making a number of home road hoppers out of inexpensive Tyco cars found at flea markets.   I run a unit coal train with black hoppers from a mix of PC, Reading, B&O and other roads, including four from the KP&W.  All maintain their talgo trucks and horn hook couplers.  Some day I may convert them and add metal wheels.  Since the coal train is operated as a run-through only, and doesn't back up, I don't run into the usual aggravations of horn hook couplers causing derailments. 

Lettering and numbering the hoppers was a grand experiment in attempting to see if rubber stamps could be used instead of messing with white decal sheets (I could never get the black background on the decals to match the black car body!) or by paying a decal business to create custom decals.   So, for $20, I had a Kings Port & Western stamp made and also purchased a pricing stamp at an office supply store that let me set any series of five digit numbers I wanted.  I thought I might have discovered a wonderfully inexpensive way to letter and number cars!   The results are ...OK....   Unfortunately the white ink on the stamp always comes off looking a bit faded; certainly not as bright and solid as decal letters.  The numbers didn't turn out too badly though.  The biggest challenge is printing the stamp as straight as possible.  The ink is forgiving for a minute or so and can be easily wiped off for a re-try.  The cars above probably took me three or few trials before they looked straight to me.   Considering that my interest in freelancing the KP&W has continued over the years, I think it may be time to bite the bullet and contact a  custom decal  company about having professionally made logos for my road.

Let's move on to locomotives.   After painting the S-12,  my next customized KP&W motive power was this pair of switchers.   
You'll notice that the lettering is orange.   This was an attempt to try avoiding the use of white decal paper.  The letters printed out rather lightly and transparent on the clear decal sheets but there was enough color to make them legible on the switchers.   After trying this experiment, I think I prefer white letters on the blue loco bodies.  

This pair of F7s (below) purchased from the used equipment section in the back room of my LHS are Athearn units, one powered, one a dummy.  The powered unit includes the extra heavy weight inside that allows the set to pull well.   I custom painted the pair, trying my hand at masking off the orange stripes.   The white letters are from white decal sheets with an orange background created to match up with the stripe.  Again, this required considerable trial and error.  These units are the work horses of the KP&W, often assigned to transfer runs between Kings Port to West Mill, or to Mayfield Yard. 


One day while visiting the aforementioned  back room of the LHS, I found two Athearn SD9 shells, one decorated for the Milwaukee Road and the other for the Great Northern.   I was struck by their similar paint schemes with dark bodies and orange stripes.   With a little effort I modified them into a matching set, to which I easily added BLACK Kings Port & western lettering from home made decals on clear sheets.   I decided that these units represent the newer KP&W scheme of the 1970s.  Perhaps as the Penn Central cut costs with their simplified scheme, maybe the KP&W was hoping to as well...or perhaps it just seemed fashionable to change the road's image for the new decade.  I'm not sure if I'll paint any additional units in this scheme or not.   Time will tell


Some odds and ends.  First up is this SD9 shell with an experimental scheme intended to keep units blue and orange but with the easy to apply black lettering.  I seriously over-painted the shell during successive trials to make it look right but its not a bad option for future units.  I liked being able to add the NY State outline to the herald on this one.   I don't run locos with this sloppy shell that lacks hand rails but it is a good reminder for me about painting options for future roster additions.  

A similar experiment with an old AHM C-Liner shell and an Athearn F7 B unit.  You'll notice the difference in paint shades between the two units.  The blue and orange on the left hand unit are the original KP&W colors, but after a while the blue rattle-can shade no longer seemed to be available in any of the hardware or big box stores in my area.  Out of necessity, I switched over to the shades on the right which seem more subtle.    Careful work with painter's masking tape made those angular orange patches possible.

Last but not least...A KP&W truck!  I found the trailer at a flea market already in this fine shade of orange.  It just begged me to letter it for the home road freelance!

Well, that's probably more than enough for now.   I'm planning to describe operation between the KP&W and the Penn Central next time! 

Monday, December 7, 2015

Introducing the Kings Port & Western


You may have noticed some references to the Kings Port & Western RR or seen some KP&W equipment in some of my previous posts.  It’s time for me to formerly introduce my freelanced railroad that interchanges with the Penn Central on my layout.

KINGS PORT & WESTERN RAILROAD


I can trace the initial motivation for adding a freelanced road to my Penn Central-themed pike from my enjoyment of the 2006 edition of Great Model Railroads.  This layout-packed issue includes articles about Eric Brooman’s Utah Belt and Matt Snell’s Conrail New Jersey Division.   Both layouts included small short lines (the Southern San Pedro and the Rahway Valley RR respectively)  to add interest . I liked the idea of having a colorful locomotive from another road rolling by in contrast with the black PC roster on the Kings Port Division.


The largest city on my layout is Kings Port so it seemed natural that the freelanced line would connect there.  Since my layout is loosely (very loosely) based on the Penn Central’s River Line along the Hudson River, I considered the PC’s western oriented branch lines between New York City and Albany and used them as inspiration for the “& Western” part of the new road.   The KP&W  originally wasn’t going to be very big.  I first imagined it as a short line that would have a switcher emerge from this hidden track next to the reddish building at Kings Port…


…drop off a couple of cars to interchange with the Penn Central…


 …and head back into staging.  


As time went by and I thought more about it, the KP&W has grown larger and I now see it as an independent railroad along the lines of the Delaware & Hudson, but more on that later.   For now, here are some of the locos and rolling stock in the freelanced KP&W scheme. 


First up is this dummy AHM RS3 I bought at a flea market for two dollars.  It was originally painted and lettered for the Penn Central, rather inaccurately.    I used this cheap model as my experimental canvass for painting and decaling.   The orange and blue colors reflect my love of the NY Mets (National League Champions this year!) even though I chose a more muted shade of blue.    The lettering was my first attempt at creating my own decals.   I used Testor’s white decal paper for the white letters.   This requires making a background color on the decal to match the body of the loco.  It took considerable trial and error to achieve the correct shade but I think I finally nailed it.     


Once I was satisfied that I could paint and decal a locomotive, I moved onto the Athearn  Baldwin S-12 (shown in the above pictures) that was originally painted for the New York Central.    


At first I was planning to have the KP&W switcher push cars from various roads into the interchange but I decided it was time to create some home road rolling stock.   I experimented on some old Tyco 50 ft boxcars and later purchased a six pack of undecorated 40 ft.  Atlas Trainman plug door boxcars.   Here are a couple of examples.

 The KP&W herald with the name of the line superimposed over an outline of the State of NY was the result of more trial and error with design and in learning the intricacies of Microsoft Word.   I've since learned how to add text over an image but my earlier attempts at creating decals involved applying the NY outline and then placing the name as a separate decal.  I was pleased to see that the double thickness decals weren't a problem.

I don't want this post to get too long so I'll finish with some cabooses, but more photos and descriptions of KP&W equipment will follow in future posts.

My early attempts at creating a caboose roster are now considered to be in the KP&W's "early scheme" with the blue and orange complimenting the similarly colored locos.

 As I attained more skill with decals, I opted for an all orange scheme so I could apply black lettering instead of dealing with the hassles of using white decal sheets.  These two wide vision cabooses were originally factory painted for the Penn Central although the PC didn't have any in this style.  The KP& W does, however, which is the beauty of freelancing.  You get to choose the rules and everything is correct!
One more before we go.  I cobbled this transfer caboose from spare parts leftover from other caboose projects.

More to come soon!


Wednesday, December 2, 2015

Signals at Kings Port video

It took me longer than expected but here is the Youtube video showing the signals at Kings Port in action.

https://www.youtube.com/watch?v=Ab1CsOybEak

Thanks for taking a look!