Tuesday, May 30, 2017

P.C.C.M. #35B: Yard Work Preparing a Cut for WV-2

The resumption of "virtual ops" between the Kings Port Division and the New York Central Train Layout is a happy thing!   The crew of the West Mill Yard switcher isn't so pleased, however, as assembling the cut of cars to be picked up by train WV-2 will take a lot of work since they are scattered throughout the yard.

Armed with their switch list, the intrepid crew of Switcher #8951 dives into their work and starts moving cars out of the way to access the ones they are looking for first.  The cars will be blocked into sections that should make switching more convenient for the Terminal Yard crews.

They're just getting started and it ain't gonna be easy!  Yardmaster Cappy Foster is unsympathetic.  Its time to get the virtual ops up and running again!

First up is a block of cars for Bedford.  These include a pair of 50 foot plug door cars that are empty for Universal Milling.

Coupled onto the plug door cars are two cars for Heilemans Brewery.  The NYC Hi Cube is empty to receive cases of "long neck" bottles for Reynolds Beverage Distributors in Kings Port, while the B&M car is loaded with new bottles for Heilemans from Corning Glass.

Coupled together...
That completes the Bedford Block.

Next up is the East Bedford Block, including this Atlantic Pacific RR. RBL car loaded with windshields from Corning Glass, and an 86 foot NYC auto parts car from ACME Auto Parts, both for the Ford plant.    They are coupled up with two NYC 50 footers from Peerless Appliance loaded with kitchen appliances for All City Storage.


 This completes the East Bedford Block.


After that, the switcher crew assembles the East Empire City Block.   This includes a PC gon loaded with steel coils for Gervais Pipe and Fittings for the manufacture of construction pipes...

....this TDLX Cargill covered hopper, empty for Cargill to receive barley for Cavendish Foods and Spirits to make their fine One Year Aged Scotch!!!....

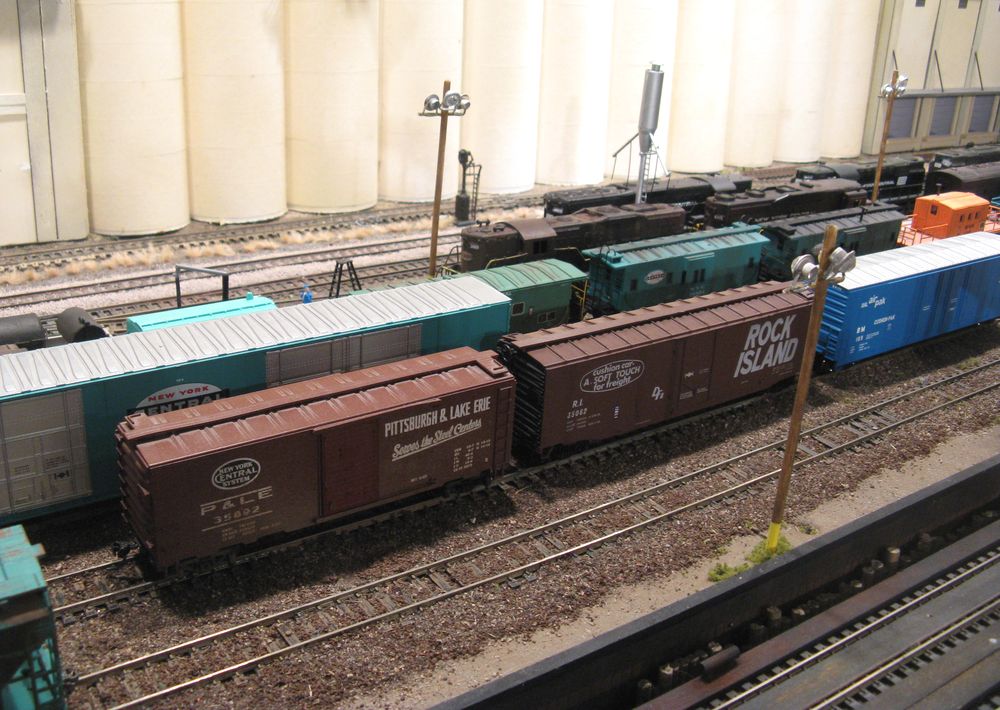
...And, this empty Rock Island 50 footer which travels quite a bit between Ralph's Grocery Warehouse in East Empire City, NY and Ralph's Grocery Warehouse Midwest in Davenport, Iowa.   

The RI car needs to be uncoupled from the P&LE car....

... so it can be placed with the other cars headed for East Empire City, completing the block.

Removing the Rock Island car fortunately expedites another move. 

The switcher crew pushes the P&LE car (empty for Prestige Gear to load for Peerless Appliance) all the way to the end of the yard to retrieve a PC 40 ft. boxcar loaded with 55 gallon drums from KP Steel for Drywell Inks..

This two-car block for West Empire City is tacked onto the cut for WV-2.


Finally, these two empty TOFCs are for Terminal Yard while the two 38 ft. hoppers loaded with aggregate behind them are to be transferred to the L.I.R.R. for NY State DOT Region #10's highway project.  

One end of the almost completely assembled cut of cars for WV-2 can be seen in the background with the B&M car and NYC Hi Cube.

The final block is coupled to the cut for WV-2.


An aerial view of the long cut of cars for WV-2 as seen from the North...

...and the South.   The crew of switcher #8951 coasts down a cleared yard track to the right.

Next up:  WV-2 arrives from Weehawken and picks up the cut from West Mill.

Monday, May 29, 2017

P.C.C.M. #35: Back to the virtual Ops!

Its been a while since posting about a Penn Central Car Movement (P.C.C.M.).    This has been due to the Kings Port Division's partner layout, The New York Central Train Layout (N.Y.C.T.L.), being temporarily shut down due to a home improvement project.

Here is a link to John's description of the closing of his layout.
http://newyorkcentrallayout.blogspot.com/2017/05/the-real-world-invades-nyctl.html 

Happily the project has been completed and the N.Y.C.T.L. is ready to receive cars again.    That being the case, its time for Yardmaster Cappy Foster to get back to work organizing cars that will be shipped to Terminal Yard.


Trains have been running on the Kings Port Division despite the temporary shut down of the N.Y.C.T.L.  as can be seen by the presence of so many P.C.C.M. cars at West Mill Yard.  These are cars that were involved in previous P.C.C.M.s and have been picked up from various industries on my layout to be forwarded on to Terminal Yard.  Some are loaded and some are empty among the examples below...


NYC switcher #8951 is boarded by yard crew members to start stringing together a cut of cars that will later be picked up by WV-2 (Weehawken to Selkirk) for eventual transfer to Terminal Yard in Empire City.

Just as the switcher heads out to work, Train VW-1 (Selkirk to Weehawken) can be seen passing by in the background, headed by a pair of GP38-2s.


The switcher works its way through the yard tracks and switches to reach the first cars of the cut.   Meanwhile VW-1 continues to roll by...


A trio of KP&W ribbed 50 foot boxcars is seen on VW-1.  These were picked up at Kings Port and will work their way to Weehawken where they will be transferred to the Atlantic Pacific Railroad (Neal's Layout) for future virtual operations.
  

The cars heading to the A.P.R.R.'s Rock Ridge Yard will be seen in future P.C.C.M.s!
  
Next up: Yard work to prepare the cut for WV-2.

Friday, May 26, 2017

Kings Port & Western Cars for the A.P.R.R.

These three 50 ft. KP&W cars are being set out on the interchange track near Williams Yard so the Penn Central can pick them up and transport them to Weehawken, where they will later be transferred by the Atlantic Pacific R.R. (A.P.R.R.) to its own Rock Ridge Yard. 


The A.P.R.R. is fellow modeler Neal's freelanced railroad.   With painting and decal assistance provided by John of the New York Central Train Layout, Neal has generously sent some of his home road cars as gifts to other layouts including my Kings Port Division.   Here is a picture of one of  Neal's great looking white A.P.R.R. boxcars at West Mill on my layout.

 Neal recently told me that he'd like to have some KP&W cars so he could participate in "virtual operations" with the Kings Port Division.  If you've been following my blog you know that virtual operations involve photographing identical rolling stock with matching numbers to convey the idea that cars from one layout have moved to another layout for pick ups and set outs at industries located on both model railroads.  This is great fun!

Neal proposed a generous plan of sending me five Athearn Blue Box 50' cars so I could return three to him and keep two for myself. Eventually I'll find another matching car to complete the set of three at my end.  

A few weeks ago a box arrived at my house!   It contained five identical BB 50 foot sliding door boxcar kits to be painted as KP&W cars!


Up to now, Kings Port & Western boxcars have looked like the car below with the large KP&W initials on the left side of the car and an outline of the State of NY with the road name superimposed over it on the right. 


The cars Neal sent me, however, posed a challenge because they have ribbed sides.  I realized that my typical scheme and already- available decals would not fit on them. The NY state outline wouldn't rest well over the ribs and the usual font size for the KP&W initials was too large to fit between them.   What to do?

I realized I'd have to develop an alternative scheme.   Relying on my old friend Google Images,  I did a little research and found a photo of a Kansas City Southern car that inspired what seems like a perfectly suitable revised KP&W scheme for ribbed cars.


Once I had an idea of how to proceed, I set to work.  First, the undecorated black cars needed a coat of white primer.   I used a paint that especially adheres to plastic.  Humid conditions in my garage and basement led to a long drying time for the primer.  Fortunately Neal is a patient fellow and wasn't concerned about time lines for project completion. 


Once the primer coat was completely dry I applied three light coats of this orange paint that has become the KP&W boxcar standard.

The cars dry outside on a nice day with low humidity (finally!) in Minnesota.

And now for the decal work!  

While I've paid to have white decals like the road name on this RS3 professionally made, I enjoy making my own black lettering.  This turned out to be fortuitous since I needed to customize decals for Neal's cars.  Had I relied on professionally made KP&W sheets I wouldn't have had the flexibility of adapting to these particular cars...without contracting to have new ones made, of course!

For homemade decals I use these full-size clear decal sheets from Micro-Mark.   I've used them for a few years with usually good results but there are some things to keep in mind that I'll cover a little later.


First I created the graphics using Word on my computer and printed them out on paper using the best quality printer setting to get good dark black letters and numbers.  You can actually print the decals on your home computer by inserting the decal sheet in your printer's paper tray,  but experience has taught me to go to an office supply store instead and ask them to run my printed paper sheet through their copier to print the decal sheet.  They tend to have better quality settings and the letters come out nicely opaque.  It cost me 15 cents to run off one decal sheet.   Put that on my expense account Neal!  :)

Its very important to seal the decal sheet soon after printing.  Give it a few minutes to thoroughly dry and then over-spray the sheet with a non-acrylic gloss spray.  I set the sheet aside for hours after that just to be sure all is dry.  I brought a can of gloss spray with me in the car and sprayed the newly printed sheet in the office supply parking lot.  Here is a pic of the deal sheet after I started cutting into it.


You'll notice that I include a lot of duplicate graphics, repeating the logo and car numbers several times in case of errors in printing or application.   The ink on homemade decals might run if not properly sealed and sometimes they don't apply perfectly and have to be redone.  Its good to have spares.   Despite these aggravations, homemade decals are a very cost saving way to go and you can cheaply create as many variations of your decals as you have decal sheets.

I had some Microscale freight car data decals but not enough that included info like freight car capacity.  So, I made my own!   I think the examples below are printed in 5 or 6 pt font.  I made way more than I needed for the five cars but I can use them for future projects. 

Jumping ahead a bit, here is a car with all the decals I used.   The left side of the car has all homemade decals while the right side sports Microscale decals such as...

...ACI plates...

...COTS labels....

...and other car data.  These always drive me crazy because the lettering and numbers are so small and the decals are tightly printed next to each other.    To make it more challenging I had to cut the data in half vertically to accommodate the ribbing.  Half of the info on the decal is on either side of the rib.

Getting back to techniques I find helpful with home made decals:

1. Seal them well with non acrylic gloss spray.

2. Before applying the decals cut the clear decal material around the graphics as close to the graphic as possible.     Otherwise edges of the blank material sometimes show up around the graphic and spoil the appearance.  

3. Homemade decals on Micro-Mark's sheets seem to take a longer time to set than Microscale professionally printed decals.  This gives you some time to carefully locate and straighten decals.  Since I had to apply the KP&W initials individually between the ribs this was a good thing!   Once the K.P.&, and W were applied I was able to make tiny adjustments using a pin to get them in line.  

4. The homemade decals seem to float more in the setting solution than professionally made decals.   This can cause tiny movements and create subtle but maddening misalignments.  I tear a little bit of paper towel to get a rough fibrous edge and carefully dip it at the edge of the puddle of setting solution.  Capillary action draws it away, helping the decals settle down.   

5.  Micro-Mark recommends brushing more solution over the decal once it starts to settle.  This does seem to help.

6.  Once the decal is nearly set you may still see a wrinkle or even a curled up edge.  Dampening a paper towel, forming one end into a tight little ball, and lightly pressing it flatly onto the decal irons it out and seems to be a good finishing move.

7.  I let the decals dry for 24 hours and then over-spray the car with gloss.  This seals the decal on  the car and also helps hide any decal edges.   You might still see some annoying traces of decal lines though.

8.  Fear not!  A final over spray of Dullcoat really does a nice job of blending the decal into the body of the car.

Once the car bodies were completed, I assembled the chassis by fitting the car weight and under frame to the car's floor.   I took a page from John's play book (of  N.Y.C.T.L. fame) and painted the weight flat black to prevent rust and create a uniform appearance under the car.  

Neal provided metal wheels and KayDee couplers for the cars so I happily installed those upgrades for the original plastic Athearn wheels and horn hooks.  The competed cars looked like this one below.


This has been a fun, albeit very gradual, project and I'm very pleased with the results.  I'll soon be packaging and sending three cars to Neal numbered 644450, 52, and 55.  I will keep two cars so we now have two in common for virtual ops. As noted previously, I plan to find a third car to paint to match the third one send to him.

This has been yet another example of the generosity and camaraderie that can be enjoyed in model railroading.   Look for these cars to be featured in future "virtual ops in my blog!